For those reading this blog, you have seen that my grandmother passed away last week. Due to this event, I have fallen slightly behind on my posting and crafting. I will restart posting pins in the next few days, no more than week off. I sorry for the delay; however, my family and sanity is more important than this blog right. Thank you all for your understanding.

Ever wonder if the pins you found on Pinterest was really worth it? Each day, we will let you know if those pins are really worth the time and energy.
27 May 2014
Mani Pedi in a Jar
Original Pin
http://www.pinterest.com/pin/427560558346398341/

Mani Pedi in a Jar

This is a gift in which seems like a good idea; however, it can backfire in a quick second. This can be a great idea if you know the person that you are giving the gift. The project comes with "issues" that have been brought up by a group of different people at different times that I asked them. Below are just a few:
- The color of nail polish is wrong
- The person does not do a mani/pedi
- The person could embarassed thinking you believe they have horrible feet
- The person could be offended by the idea of the gift (as one person stated that they would be)
With that being said, this is a very simple, very cost effective gift that you can give someone or for you to even take with you on vacation.
Materials
- Mason Jar
- Nail Polish
- Manicure Kit
- Pedicure Kit
- Cotton Balls
What I Did
Buy everything at the dollar store, except the nail polish. Get good nail polish if it is a gift. A good brand that will not take 6 million coats to look okay. If it is for you or a test gift, you can get nail polish at the Dollar Store. Put cotton balls in mason jar first and then fit everything else in the jar. That is it and does not need photos.
Conclusion
3 out of 5 pins. The pin a a great gift idea, if, and only if, you know that person that you are giving the gift.
26 May 2014
Terra Cotta Tiered Flower Pot
Original Pin
http://www.pinterest.com/pin/126523070754604660/


This was an beautiful concept; however, the way that they wanted to complete the project was a little more different then how I felt was necessary. This is a beautiful way in which you can displace flowers in your front yard or deck and it now be the typical look. I believe that this project could go either way; follow the directions provided with the pin or follow my directions. My directions is good for 3 tiers & their directions is good for more than 3.


Materials
- Terra Cotta Planter Pots
- Flowers
- River Rock/Bricks
- Planting Soil
- Flowers
What I Did
In the largest pot, build up the middle of the pot with a solid base. I used river rocks that I had left over from the river rock tray project, so I used those. You can use bricks that are cut in half or even staggered up until you have the height in which you want the second pot to sit on the the bottom pot. Since I used river rocks, I have to do this in layers; river rocks down, soil around the rocks, river rocks down, soil around the rocks, and repeat until you get the the height you want. At this point, you would cover the last part of the river rocks with the soil and mark where the next flower pot will go, so that you can plant the flowers around the edges.
At this point, it is just a repeat what you did for the previous Terra Cotta pot, except, on a smaller level. For the last pot, you to not need to add the river rocks and you can just plant you flowers.
Afterwards, place it where you believe it will the correct amount of sunlight that is required for the flowers that you used for this project.
Conclusion
A beautiful spring project that takes less than 2 hours and will give your garden a new looks. And if you want the kids to get involved in the project, have the paint the Terra Cotta pot prior to planting.
25 May 2014
Lollipop Bouquet - End of Year Presents
Original Pin
http://www.pinterest.com/pin/557461260096282744/
|

This is a fun present for the end of the school year, but it does take some time and a lot of patients. You can get most of the materials at the Dollar Store; however, get the lollipops at either Costco's, Sam's Club, or Target.
Materials
- Coffee cups/flower pot/bucket
- Flower foam
- Lollipops
- Fabric
- Glue gun & sticks
What I Did

It is difficult to find a flower foam that works perfectly for a decent price (Hobby Lobby has the circle ones that the pin talks about, but they are pretty expensive and you never know if they will fit the cup you want to use for this project). I have a ton of fabric from past projects, so I was able to "fill" the cup and glue the foam to the fabric.


At this point, once the fabric and the foams are attached, it is about just placing the lollipops around the around the foam to make it look amazing. This was a lot of fun and you can make it as big or small as you want.

Conclusion
4 out of 5 pins. The reason being is that it is difficult to find the foam to work perfectly on a decent budget. But this is a great end of year present.
If you are looking to purchase one of these lollipop bouquets, please email me at worththepin@gmail.com and let me know what your budget would be and I will let you know what I can create for you.
24 May 2014
The Grandmother Desserts
It has still been pretty tough knowing the next week, we will be laying to rest my grandmother.A lot of people are aware that she lived in our house for many years and there were always sweets around the house. One of the best was this apple cake that just blows my mind.
Now, I am not sure if the recipe came from my grandmother, but my mother always made it and it reminded me of my grandmother. Very simple recipe, eating the batter prior to baking, and just the smell of the house when you walk in.....ARG.
Recently, I had to bargain with my mother to obtain this recipe from her. One recipe (chicken soup) for another recipe (apple cake). I made the cake for charity function and I knew that my grandmother would have been so proud that this recipe was used to help others.
She taught my family and I the greatest of many things; love, life, nature, and family. Baking that dessert, helping those children out, having people know that her memory was there during that day, make her memory live on.
To some people, a dessert is a dish for a party or a ritual for the night. For me, during this week, knowing that I baked that cake to help people in need, that was my grandmother. And that dessert will now always be in her memory.
23 May 2014
The Dinner Table
Today there is not be a pin, as Pinterest and this blog is not something I can do for a day. I want to talk about the dinner table. One of the most important lessons I learned growing up was have dinner with your family, around a "dinner table", as much as humanly possible. This does not mean that you have to actually sit around a table, but it means to take the time, spend time with your family, and remember to communicate with no other distracts, except eating the food. This was the time in which our family was a family and we talked about the day, how life in general was going, and stories, laughter, and sadness were shared.
In my life, I lost 2 very important people this past week, one being my grandmother. She was the picture of "dinner around the table". That was the time for family. That is when you were the picture of a perfect family, for about an hour, every day, not matter what was going on in life. She taught my mom this practice and I will teach it to my family in the future. I practice it now with Pyro as much as humanly possible. We might not sit down at a table every night, but every night that we have dinner at the same time (thank you work schedules for making this impossible certain nights), we will be together, we eat together, we talk with each other, we practice the lesson taught by my grandmother.
The pins I post on Fridays are to bring your families together around a table. Please, make this a practice in your household. Whether it is cooking the whole meal together, or just eating the meal you prepared together, for an hour a night, enjoy the recipe as a family and remember how important it is to have dinner with them.
22 May 2014
Pull Apart Pizza Bread
Original Pin
http://www.pinterest.com/pin/112660428152524446/

Pull Apart Pizza Bread

Pyro LOVES pepperoni bread. Not just, like every so often, it is a love that is only surpassed by fire, the Mustang, video game, & myself. And myself might be on par with the pepperoni bread. At first, I attempted to make it a completely different way then what the recipe stated to attempt. That was stupid. It did not become pull apart bread, it became pull apart cake...lol. I finally decided to actually listen to the recipe on the site and it was perfect. I was stupid for trying to be fancy with the recipe.
Materials
- Large Mixing Bowl
- Cutting Board
- Knife
- Food Processor
- Bunt Pan
Ingredients
- 2 can of biscuits
- 2 cups of shredded mozzarella
- 1 cup of chopped pepperoni
- 1/3 cup of olive oil
- Parsley or Oregano
What I Did

Preheat the oven at 350 degrees. Pop open all biscuits, cut them into quarters, and put into the mixing bowl. As a food snob (okay, not really, but I married into an Italian family so certain foods just taste better when it is a better quality), I took fresh mozzarella and shredded it in the food processor. My favorite kitchen appliance is my stick blender with the food processor attachment.


I cut pieces off a larger piece of fresh mozzarella and shredded it until I got 2 cups. This is the same thing with the pepperoni. Throw everything into the large mixing bowl.

Once everything is in the mixing bowl, add 1/3 cup of olive oil. I used a mixture of regular and garlic infused olive oil. Add parsley or oregano. I used oregano. Mix everything with the olive oil until the biscuits, pepperoni, and cheese are coated. Once everything is coated, placed into the bunt pan. Put into the oven for 30 minutes. Check at the 30 minute mark to make sure that center is cooked through. For this one, it took a total of 45 minutes for cook all the way through.

Conclusion
Follow the recipe. Do not be stupid like I was and attempt to do it a fancy way. The only thing that I did not like is the parsley. Parsley does not stream pizza bread, that is why I choose oregano. Oregano is pizza, not parsley.
21 May 2014
Gummy Bear Popsicle
Original Pin
http://www.pinterest.com/pin/53409945555700272/

Gummy Bear Popsicle
Since the minions come over a lot for gathering, I wanted to make a snack for them that ALL of them could have, since a few have allergies that do not allow them to have "normal desserts". This pin is a great, simple, fun, easy snack for them to have during the day.
Materials
Gummy Bears
7-Up/Sprite/Ginger Ale
Popsicle Mold
What I Did

This is extremely simple. Rinse out mold. Add gummy bears to mold, to about half way up. Add soda to mold. Put in freezer. Freeze overnight. Done. Seriously. Done. Nothing more. Nothing less.

Conclusion
4 out of 5. Almost every one of the Popsicle molds did not become a Popsicle. Yes, the froze over and became a frozen treat, but not a Popsicle. One of the ways that we learned to update this is to attach a few gummy bears to the stick of the Popsicle mold. This ensures that the Popsicle will become a Popsicle.
20 May 2014
Detox Bath
Original Pin
http://www.pinterest.com/pin/358036239095995909/

I am not a bath person. Maybe this is due to the fact that I swam for many years and quick showers were they way to go, but I never really enjoyed the idea I just soaking in a tub. One of the things that my massage therapist stated to me the other day was to try a few detox methods within a single week. Detox drink, deton food, detox bath. I am good on the drink and bath, but the food, a little harder due to my work schedule and not a lot of detox foods will survive a two hour commute into work.
Materials
- Epsom Salt
- Baking Soda
- Ground Ginger
- Aromatherapy oils (lavender or chamomile)
- Glass of water
Optional
- Bowl with ice water
- Wash cloth
What I Did
Okay, not pictures. I am sorry, but you do not need to see me in a bathtub. I followed the instructions on the site word for word. I gave myself 40 minutes of time to soak (ugh). I like my water hot, so I made sure that it was hot enough for me to handle. I added the 3 cups of lavender Epsom Salt (Walgreen's has this), 1 cup of baking soda, 1 tablespoon of ground ginger, and about 20 drops of lavender aromatherapy oils. Stepped into the tub and soaked. I had my large glass of water next to the tub, as the site told me that I should drink water as I am doing this. After about 15 minutes, I started to get restless because I do not like sitting in a tub and I felt horrid. Then I realized something very important and it made things so easy; the steam and heat of the tub makes me feel suffocated. It is the steam that is in a tub, the hot air filling my lungs, and I feel sooooo uncomfortable. I quickly jumped out of the tub, grabbed a small bowl, filled it with ice and water, grabs a face cloth, soaks the face cloth in the cold water, and got back in the tub. I put the cold cloth on my forehead and it worked. I was breathing in the cold air from the wash cloth, all while letting the bath do the job it was meant to do. I did have to drain and rewarm the water twice in the 45 minutes (I added time with my little trip out of the tub), so I added a 1/4 cup of salt with each drain. After the 45 minutes, I felt different and in a sense, refreshed. I did a quick scrub down with my loofah and called it a night. I really did not feel the effects until teh next morning. I felt relaxed, refreshed, and well, glad I did this on a Saturday, as if I had to run around the next day, it was not happening.
Conclusion
This is a good body detox. Although it says you only need the 40 minutes for the soak, you need at least 2 days; one day for the soak (close to bed time) and the next day to drink about 2 gallons of water and to relax your body to pulling out all the "toxins" in your body.
19 May 2014
Mason Jar Night Light
Original Pin
http://www.pinterest.com/pin/265712446739536431/

Easy Mason Jar Luminaries
One of my friends from college (1st attempt, not 2nd) loves Pinterest as much as I do. Amy pins so many amazing ideas that there are too many to count. Every so often, one will pop up on my feed and I have to try it. This is the first one that I found that I feel in love with. The pin itself it pretty self explanatory. It is fun, easy, and simple. I, personally, think that mason jars are over used and this is a project that could be used not just as a luminary.
Material
- Small Glass Vase
- Glass Stones
- Flame less Candle (I consider this optional)
- Hot Glue Gun
- Hot Glue
What I Did

I love my hot glue gun. Pryo thinks I am a little odd for liking it so much, but it is an all around great crafting tool. This is basically the simple puzzle. I laid the glass beads out on my crafting surface to get a full view of what I had available in order to create the correct puzzle. I recommend starting at the base of the jar/vase/mason jar that you use and work your way to the top. I had to pop off some of the glass stones more than once (more than a dozen times actually) to make the jar look complete. My biggest complaint about this project is the time ti took to make a SMALL jar. Over 3 hours. 3 hours. Now, this does not seem like a lot of time, but I think about it this way. Let's just say I make $10.00 an hour. The cost of materials is minimal, as the only thing that I really needed to buy was the jar, as I had the other materials in hours. This means, that this little jar cost me $30.00 of my time to make. To the defense of the project, it was my first time attempting and it probably took a lot longer than it will in the future, but still, it was a long time for me to find stone, put glue on stone, add stone to jar, repeat.

But I will say that the finished it stunning. There are going to be holes in between the glass stones. This is what make this jar look amazing. Especially if you use it as a luminary.

Conclusion
If you like the look and you have the time, make it. It is beautiful and you can choose the type of jar and how you would like to use it.
If you would like to purchase this item, please email me at worththepin@gmail.com, tell me the size and use of the product, and I will quote a price.
18 May 2014
Crayon Vase - End of School Year Gift
Original Pin
http://www.pinterest.com/pin/281826889154368151/


While at one of the many family events over the past month, my family stated that they are still trying to come up with some ideas for the end of school year gifts for the minions' teachers. This got me to thinking about a bunch of ideas of what could the minions do and it also be a good gift for the teachers. Since some of the times the gifts are a little more complicated for the minions to attempt, I figured the next few Sundays will be dedicated to end of year gift ideas. This idea was a lot of fun. For some reason, I have really like the idea of using crayons for anything and everything. Maybe it is a chance to get back into my childhood. It took a while to find a pin that I liked for this project, as I saw a picture a friend posted on Facebook and the picture was not from Pinterest. Honestly, the pin I found was helpful and easy to use.
Materials
- Square/Rectangle Vase
- Crayons
- Hot Glue Gun
- Hot Glue Sticks
- Ribbon
Optional
- Fake Flowers
What I Did

This a a very simple project. I made a pattern of colors for the crayons and started gluing them to the vase, leaving the corners bear. The reason I left the bear is for a simple reason; the vase I purchased had rounded corners. Since this was the case, any time I attempted to place the crayons around the full vase, they started to tilt and did not lay straight up and down.

Once all of the crayons were glued to the vase, I found a ribbon that I fell in love with that matched the theme perfectly. You can choose to place the ribbon anywhere around the vase; however, I enjoyed not covered too much of the natural crayon printing, so that is why I placed it where I did. At this point you can stop and call the project complete and you would be fine. All you would need to do is put a bow or tag where the ribbon connected to the vase and make it look pretty. I wanted to make sure that the glass vase was not truly seen, so I took fake flowers that I had left over from another project and glued them to the corners. After everything is dry and done, you can either just give this as the gift or fill it with whatever your heart desires; chocolates, pens, rulers, flowers.

Conclusion
5 out of 5. Simple, easy, fun, and a different type of gift to give the teachers.
If anyone would like to purchase one of these, please email me and I will give you all the details.
17 May 2014
Drunken Melon Balls
Original Pin
http://www.pinterest.com/pin/489133209501570508/

Drunken Melon Balls
This was a pin that I put up for Pyro's family to attempt and turns out that I am the one that made it. It is a little surprising since neither Pyro or I are very big drinkers and, well, this is a very alcohol infused snack/app. I do not like the pin itself, as it brings you to a site that has over 50 different "alcohol" recipes, so I did further search on how to create this dish.
Materials
- Large Serving Bowl
- Melon Baller
- Cutting Board
- Large Knife
- Tablespoon
- Cantaloupe
- Honey Dew
- Watermelon
- Pineapple Juice
- Flavor Vodka
- Peach Schnapps
- Regular Vodka
What I Did

Get a large, and I mean LARGE serving bowl. Cut the honey dew, cantaloupe, and watermelon is half. I bought a seedless watermelon to make life easier. With the honey dew and cantaloupe, spoon out the centers with the seeds and rinse of the halves.

Once everything is set up, use the melon ball on each half of the melon until it is clean out of "fruit meat". This part was oddly satisfying. And easy. At first I freaked out about making the "perfect melon balls" and then I realized I was being stupid and just to go with the flow. It was a lot of fun and it makes for a cool looking shell at the end. Now, this can also be done with the children; however, you are going to want to skip the next part if the children are involved.
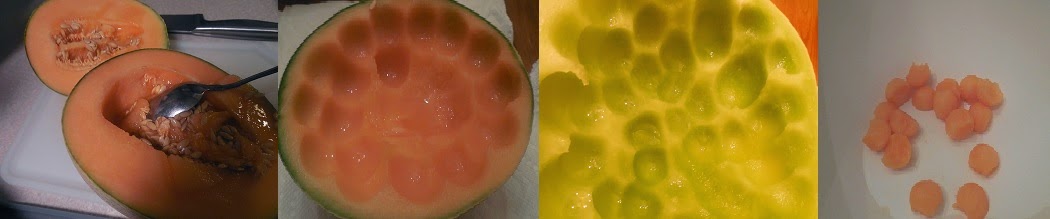
I mixed in a 2 to 1 ratio of alcohol to fruit juice. I got a 64 ounce bottle of pineapple juice, which I used about half of the container, which covered about half of the fruit. I drank the rest of the pineapple juice, because I love pineapple juice and you have no right to judge me. In the same container, I mixed in the flavored vodka (Smirnoff Sorbet Light Mango Passion Fruit), vodka (Smirnoff), & Triple Sec (we did not have peach schnapps in the house). Basically, I used the left overs that we had of each bottle until my pineapple juice bottle was completely filled. I added this to the melon balls and pineapple juice. I then covered the bowl and placed in the fridge over night.

All I can say is "DEAR LORD". Like I said at the beginning, I am not a big hard liqour drinker. Actually, I am not much of a drinker at all; however, I tried on of these prior to leaving for the family gathering and it was strong. Very strong. Very, very, very good, but very, very, very strong. I believe I should have gone for a 1 to 1, adding more pineapple juice, not getting rid of any of the alcohol. Apparently it was a big it, because none of it came home at the end of the night.

The pin itself it worthless. You have to scroll through post after post after post of alcohol-themed...well, everything. The concept, awesome. Look for a different pin, a different site, a different recipe. Mix up the alcohol, juices, fruit, that you use. You can come up with some pretty awesome flavors if you just experiment. And if you have friends and family that like a good "snack" in which they can crash on the couch, you will also have victims to try out your experiments.
16 May 2014
Italian Sloppy Joes
Original Pin
http://www.pinterest.com/pin/230316968413541160/

Italian Sloppy Joe

The pin itself was only worth it for the idea, not the recipe.The pin was for "18 Italian Slow Cooker Recipes", which took me to a website that showed me pictures of the one I wanted to attempt "Italian Sausage Hero", which I then had to search the website for find the link to get to the recipe. I hate these types of pins. If you are going to give me multiple recipes:
A. Put them on the same website
OR
B. Make the links to the recipes easy to find on your website
Materials
- Cutting Board
- Knife
- Large frying pan
- Colander
- Crock Pot
- Whisk
- Wooden Spoon
Ingredients
- 2 medium red onions
- 1 package of sweet Italian sausage
- 1 small package of ground beef (your choice of meat to fat ratio)
- Diced garlic
- 1 small can of tomato paste
- 1 cup of ketchup
- Dried oregano
- Dried basil
- Hamburger buns
- Mozzarella cheese (optional)
What I Did

Dice the red onions into bite sized pieces. If you can find a package of ground sausage, you can use that; however, the sausage that we had in the house was in casings, so I took the meat out of the casing and put into the mixing bowl. Add chopped onion, diced garlic, ground beef, oregano and basil into the frying pan. Cook until all the meat is browned. Drain mixture into the colander to get rid of the liquid and fat.

In the crock pot, add the can of tomato paste & ketchup. I added extra garlic, oregano, and basil to this mixture. Give a stir with a whisk until blended together. Add meat mixture to the crock pot. Stir with the wooden spoon until coated with the tomato mixture. If you do not think there is enough tomato mixture once everything is coated, add 1/4 cup of ketchup until you are satisfied. Set crock pot on low for 4-6 hours.

Once completed, you have your meal. Pyro and I ate this as a true sloppy joe sandwich; hamburger bun and mozzarella cheese, which melted amazingly with the sandwich. This is a preference. I know a lot of my friends would eat this over pasta, rice, or just by itself.
Conclusion
The pin is worth it to find an idea, but not for the recipe. It was difficult to find and I just used teh final recipe as a guide. If you want to actual recipe, see the link below.
http://www.bhg.com/recipe/pork/italian-sausage-heros/
Subscribe to:
Comments (Atom)